
For eaves, valleys, and roof penetrations, a self-adhering rubberized asphalt membrane is the right choice for ice and water protection, and most homeowners will see one of two names on the roll: Grace Ice & Water Shield or Vycor Ice & Water Shield. Both satisfy the ASTM D1970 standard that applies to this product class. If your roof has complex valleys, steep slopes, or known ice-dam history, we recommend bringing in a licensed roofer rather than tackling the install yourself.
TL;DR:
- Local code requires ice barriers only where eave ice has occurred historically; amendments may set stricter rules, so confirm requirements with your permit office.
- Required coverage must extend 24 inches inside the exterior wall line; slopes of at least 8:12 require an additional 36 inches measured along the roof.
- Metal roofing or hot, dark shingles may require a high temperature membrane; ask your contractor to identify the specified formulation before installation.
- Installers need a clean, dry deck, minimum lap widths, and roller compaction; below about 40°F, a compatible primer may be needed.
- A standard 36 inch by 75 foot roll covers about 225 square feet before overlaps, so eaves and valleys often require multiple rolls.
Table of Contents
- Top ice and water shield picks compared
- How to choose the right membrane for your roof
- Practical installation checklist and common installer techniques
- How code dictates where and how much membrane is required
- Typical pricing by roll and where to source materials
- How Roofing & Exterior PROS handles assessment and installation
- What ice and water shield is and how it differs from felt or synthetic underlayment
- Typical lifespan and durability of ice and water shield membranes
- Maintenance recommendations and inspection tips for ice and water shield areas
- Environmental and weather conditions influencing ice and water shield performance
- Impact of local climate on ice and water shield selection and installation
- A straight take on risk and hiring a pro
- Get a free roof inspection from our roofing team
- FAQ
- Sources
Top ice and water shield picks compared
Homeowners generally compare two product families when budgeting a roof job: Grace Ice & Water Shield and Vycor Ice & Water Shield. Both are self-adhering rubberized asphalt membranes, but they differ enough in surface finish and market positioning to matter when you’re writing a spec or talking to a contractor.
Grace Ice & Water Shield carries decades of name recognition in the roofing trade. Its manufacturer datasheet describes a rubberized asphalt adhesive layer bonded to a slip-resistant surface, with a split-release film that strips away in sections during installation. It’s sold in standard and high-temperature formulations, the latter intended for use under metal roofing or in locations where deck temperatures run high.
Vycor Ice & Water Shield shows up more often through retail home-improvement stores and local contractor supply houses. It serves the same basic function, a self-adhering waterproofing layer for eaves and valleys, and homeowners who shop in person rather than through a roofing supplier are more likely to encounter it on the shelf.
- Both products require a clean, dry deck for proper adhesion.
- Both are suitable for eaves, valleys, and roof penetrations.
- Surface texture affects how safely a crew can walk the membrane during a multi-day job.
| Product | Best for | Surface type | Roll coverage | Installer traction |
|---|---|---|---|---|
| Grace Ice & Water Shield | General eave and valley protection with datasheet-backed specs | Granule or smooth (by line) | Standard contractor rolls (confirm via datasheet) | Slip-resistant granulated surface aids footing |
| Vycor Ice & Water Shield | Retail-sourced projects and smaller repair jobs | Smooth or granulated depending on product line | Standard retail rolls (confirm via datasheet) | Comparable traction on granulated versions |
Most homeowners don’t buy these materials directly. A roofing crew typically sources membrane through contractor supply, which also means warranty support and correct product matching are handled for you rather than guessed at on a store aisle.
How to choose the right membrane for your roof
The right ice and water shield depends less on brand and more on where it’s going and what sits on top of it. A few attributes decide that match.
Surface type. Granule-surfaced membrane gives better footing for crews working an exposed valley or an eave that stays uncovered for a day or two. Smooth-surfaced versions are often used where the membrane gets covered quickly or where a smoother bond to overlying material matters.
Thickness and high-temp formulations. Thicker membranes and high-temperature formulations matter most under metal roofing, dark shingles in hot climates, or steep slopes carrying heavy snow load, where standard membrane could soften or slide.
Material compatibility. Metal roofing, tile, and slate each interact differently with asphalt-based membranes, and manufacturers publish specific guidance for each. A high-temp formulation is often required under metal to avoid adhesive bleed-through in summer heat.
Before you sign off on a product, check these:
- Confirm the roll carries an ASTM D1970 designation.
- Look for an ICC/ESR evaluation report number on the label or datasheet.
- Read the manufacturer’s printed installation instructions, not just the back of the box.
- Verify the formulation matches your roof covering (standard vs. high-temp).
Pro Tip: Ask your contractor which formulation they’re installing by name, not just “ice and water shield,” since standard and high-temp versions aren’t interchangeable under metal roofing.
Practical installation checklist and common installer techniques
Good installation technique matters as much as product choice. Here’s what a competent crew does, and what you should expect to see if you watch the work.
- Prep the deck. The surface must be clean, dry, and free of debris; most manufacturers set a minimum application temperature, often around 40°F, below which adhesion suffers without a primer.
- Align before sticking. Crews dry-fit the course, then use the back-roll method, peeling the release film in sections while pressing the membrane down, rather than pulling the whole backing at once.
- Compact every lap. A weighted roller presses the membrane into deck pores and seals laps; skipping this step is one of the more common causes of adhesion failure down the line.
- Respect lap minima. Manufacturer instructions specify minimum overlap dimensions at seams, and installation guidance from GCP details these lap and placement steps for Grace Ice & Water Shield specifically.
- Seal penetrations and valleys with extra care, since these are the spots most likely to leak later if the membrane isn’t pressed tight around pipe boots and flashing.
Pro Tip: If temperatures drop below the manufacturer’s minimum on install day, ask whether the crew is using a compatible primer, not just pressing harder.
How code dictates where and how much membrane is required
Building code doesn’t require ice barrier membrane everywhere. Under IRC Section R905.1.2, an ice barrier is required only in jurisdictions with a history of ice forming along eaves, causing backup. Where it applies, the membrane must run from the lowest edge of the roof to at least 24 inches inside the exterior wall line, measured on the building’s interior face, and on slopes of 8:12 or steeper, an additional 36 inches measured along the roof slope is required.
- Wide overhangs often push the actual coverage past what one course provides, which is why many eave installations use two courses to reach full compliance.
- Valleys call for their own treatment: NRCA guidance recommends self-adhering or polymer-modified bitumen underlayment at least 36 inches wide in valleys.
- Local amendments can tighten these minimums, so confirm requirements with your permit office before work starts.
Typical pricing by roll and where to source materials
A standard roll runs roughly 36 inches wide by 75 feet long, covering about 225 square feet before accounting for overlap. For a typical eave and valley job, that usually means budgeting for several rolls rather than one, since laps and double-coursing eat into coverage fast.
Retail and contractor-supply pricing varies by brand, formulation, and local market, so a per-square-foot figure is best obtained directly from a supplier or your contractor’s quote rather than assumed.
- Contractor supply typically bundles correct product matching with warranty support.
- Retail purchase works for small repair jobs but puts the compatibility check on you.
- Always confirm the datasheet, ASTM marking, and manufacturer installation instructions before buying.
How Roofing & Exterior PROS handles assessment and installation
We start every roofing job with a deck and ventilation assessment, checking for soft spots, code requirements, and noting every penetration that needs sealing. Crews follow manufacturer lap minima and roller-compaction steps on every install, and check material compatibility before anything goes down.
- Inspect deck condition and attic ventilation together, since the two interact.
- Confirm code triggers for your specific jurisdiction before quoting materials.
- Map every penetration (vents, skylights, chimneys) for extra sealing attention.
We offer inspections and quotes, and provide assistance with storm-damage insurance claims when membrane failure or wind-driven rain has caused interior damage. For more on underlayment choices generally, see our guide to roof underlayment options.
What ice and water shield is and how it differs from felt or synthetic underlayment
Ice and water shield is a self-adhering membrane built from rubberized asphalt adhesive laminated to a slip-resistant top film, designed to bond directly to the roof deck and seal tightly around fasteners. Felt and synthetic underlayments, by contrast, are mechanically fastened sheets that shed water by overlap rather than by adhesive bond, which means they don’t seal around a nail or screw the way a self-adhering membrane does.
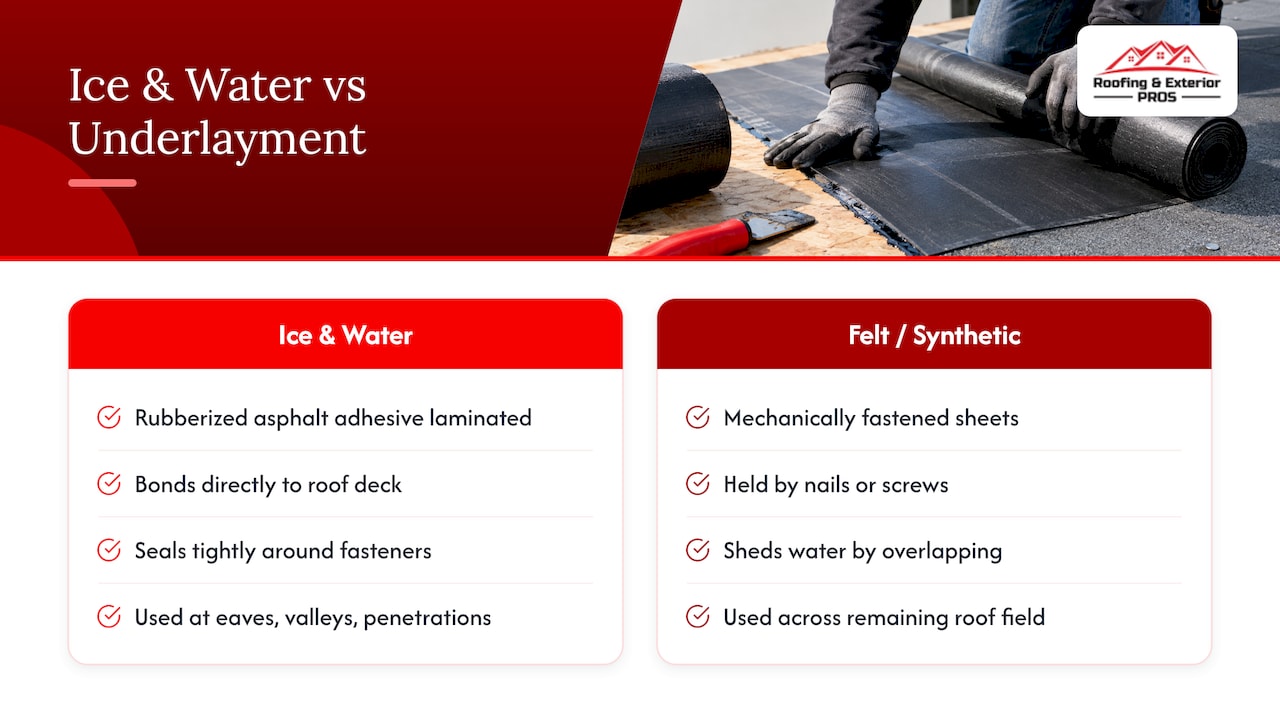
That sealing property is what makes ice and water shield suited to the roof’s most vulnerable spots: eaves where ice dams can force water backward under shingles, valleys where two water flows converge, and penetrations where pipes or vents puncture the deck. GCP’s product guidance describes this as a membrane engineered specifically to protect those zones, distinct from the broader, lower-cost role felt and synthetic underlayment play across the rest of the roof field.
In practice, most residential roofs use both: ice and water shield at the critical zones, and felt or synthetic underlayment across the remaining field. Using self-adhering membrane across an entire roof is possible and some contractors offer it as an upgrade for wind-driven rain protection, but it isn’t the default approach outside those high-risk areas.
Typical lifespan and durability of ice and water shield membranes
Once installed and covered by shingles or another finished roofing material, ice and water shield is built to last the service life of the roof system above it, since it isn’t exposed to UV light or foot traffic after the job is finished. The membrane’s rubberized asphalt layer stays flexible and continues to self-seal around fasteners for the life of the covering material, which is part of why manufacturers back it with long product warranties when installed correctly.
Durability problems almost always trace back to installation rather than the material itself. Skipped roller compaction, laps that fall short of the manufacturer’s minimum dimension, or application on a dirty or wet deck are the common culprits behind early failures, not the membrane aging out on its own. That’s one reason the installation steps covered earlier, clean deck prep, correct lap minima, full roller compaction, matter as much as the brand on the roll.
Exposure before the roof covering goes on is the other variable. Manufacturer instructions typically limit how long installed membrane can sit exposed to sunlight and weather before it’s covered, often capping that window around 60 days. Leaving membrane exposed longer than that risks UV degradation of the surface film before the shingles ever go down.
Maintenance recommendations and inspection tips for ice and water shield areas
Ice and water shield itself requires no routine maintenance once it’s sealed under the finished roof, since it isn’t exposed to weather or wear directly. What does need attention is everything around it: the shingles, flashing, and gutters that protect the membrane from ever being tested in the first place.
A seasonal inspection should include a look at valley lines and eave edges for any sign of shingle lift, cracked sealant around penetrations, or granule loss that could expose the membrane underneath. Gutters clogged with debris force water to pool at the eave, which is exactly the condition ice and water shield is designed to handle, but prevention still beats reliance on a backup layer.
If you’ve had recent storm activity, check attic spaces for water staining near the roof’s edges after a thaw, since that’s often the first visible sign that water worked past the shingles and tested the membrane below. Our guide to preventing ice dams covers the attic-side half of this picture, since insulation and ventilation gaps are frequently what drive ice-dam formation in the first place.
Environmental and weather conditions influencing ice and water shield performance
Temperature at the time of installation affects how well the membrane bonds. Manufacturer instructions generally call for application above roughly 40°F, since the rubberized asphalt adhesive doesn’t wet into the deck surface properly in colder conditions without a compatible primer.
Once installed and covered, the membrane’s job is to handle the freeze-thaw cycling that creates ice dams in the first place: snow melts from heat escaping through the roof, refreezes at the colder eave, and backs water up under the shingles. That’s precisely the mechanism self-adhering membrane is built to block, sealing tight enough around fasteners and laps that backed-up water can’t find a path through.
Wind-driven rain is a separate stress test. Some contractors install ice and water shield across a full roof deck rather than just the eaves and valleys specifically to guard against wind pushing rain sideways under shingle tabs, an elective upgrade rather than a code requirement in most jurisdictions. Humidity and attic moisture also play a role: as Department of Energy research on unvented roof assemblies notes, air-sealing and moisture control in the attic interact directly with how well any underlayment performs over time, since trapped humidity can affect deck condition from below just as weather tests it from above, so consult energy-efficient home remodeling guidance for best practices.

Impact of local climate on ice and water shield selection and installation
Climate patterns that bring repeated freeze-thaw cycles through winter are exactly the conditions IRC R905.1.2 is written around, since the code’s ice-barrier trigger applies to jurisdictions with a documented history of ice forming at eaves. Areas that see snow accumulation followed by partial thaws and refreezes are the textbook case for ice-dam formation, and membrane coverage at eaves and valleys is the direct code response.
In our St. Louis-area service territory, winters bring enough freeze-thaw swing that eave protection is a standard part of a properly specified roof system rather than an optional add-on. Humidity swings through the region’s hot summers also factor into material choice: a high-temperature formulation under dark shingles or metal roofing helps prevent adhesive softening during peak summer deck temperatures, which matters as much locally as the winter ice-barrier requirement does.
Because local code amendments can adjust these baseline requirements, we check jurisdiction-specific rules as part of every quote rather than assuming a blanket standard applies. Homeowners planning a reroof in the area are better served treating ice and water shield placement as a year-round climate question, not strictly a winter one, since both summer heat and winter ice stress the same membrane.
A straight take on risk and hiring a pro
Here’s where we land after years of tearing off roofs that failed early: the membrane brand matters less than whether the lap minima, deck prep, and roller compaction were done right, and most failures we see trace back to installation shortcuts, not material defects. Pair correct underlayment with adequate attic insulation and ventilation, since ice dams often start as a ventilation problem long before they become a roofing one. For anything beyond a simple repair, hire a licensed pro.
— Jake Ehlinger
Get a free roof inspection from our roofing team
We handle ice and water shield installation as part of residential roofing jobs, along with storm damage restoration and inspections, so you’re not left guessing which product or placement your roof needs.

If a past storm has you wondering whether your eaves or valleys are properly protected, request a quote through our roofing services page and we’ll walk your roof, check your code requirements, and give you a straight answer on what it needs.
FAQ
Does ice and water shield actually work?
Yes. As a self-adhering membrane that bonds directly to the deck and seals around fasteners, it blocks the backed-up water that causes ice dams far more effectively than overlapped felt or synthetic sheets, which is why building code specifically calls for it in ice-prone jurisdictions under IRC R905.1.2.
Is it okay to put ice and water shield on the entire roof?
It’s allowed, and some contractors offer full-deck coverage as an upgrade against wind-driven rain, but it isn’t a code requirement outside the eave, valley, and penetration zones that IRC R905.1.2 addresses. Most residential jobs pair targeted membrane coverage with felt or synthetic underlayment across the rest of the field.
What is the best ice and water shield for roofs?
Grace Ice & Water Shield and Vycor Ice & Water Shield both meet the ASTM D1970 standard and perform well when installed to manufacturer specifications. The better fit depends on whether you need a high-temperature formulation for metal roofing and whether your contractor sources through supply houses or retail.
What does ice and water shield cost per square foot?
Pricing varies by brand, formulation, and local market, so it’s best confirmed directly with a supplier or contractor quote rather than estimated generically. A standard roll covering roughly 225 square feet is a useful reference point when comparing quotes across contractors.
Sources
- 2021 International Residential Code (IRC) — R905.1.2
- NRCA roofing guidelines — valley and underlayment guidance