
Downspouts belong at roof corners and valley low points, discharging at least 5 ft from the foundation on grade, or 10 ft if the water runs to an underground catchment system. Basements often call for 6 ft minimum. Plan one downspout every 20 to 50 ft of gutter run, and when the math or the soil looks tricky, a professional inspection settles it fast.
TL;DR:
- Allow 1 square inch of downspout cross section per 100 square feet of roof, rounding up when matching the calculation to standard sizes.
- Route upper story downspouts to the ground or a buried pipe instead of dumping runoff onto lower roofs, windows, doors, or walkways.
- On clay, use rigid, nonperforated pipe to daylight or a drywell, and never connect downspout laterals to a separate foundation drain.
- Maintain a 5% slope away from the foundation across the first 10 feet; patios and driveways need at least a 2% slope in that zone.
- Inspect gutters twice yearly and after major storms, and replace flexible extensions that sag or collect debris instead of relying on them as permanent drainage.
Table of Contents
- Where on the House to Place Downspouts
- How Many Downspouts You Need and How to Size Them
- Directing Water Away: Extensions, Buried Pipes, and Daylighting
- Site Grading: Why Slope and Soil Decide Safe Discharge Distance
- Materials and Installation Details That Affect Performance
- Maintenance Checklist and Common Placement Mistakes
- Roofing & Exterior PROS: What a Professional Inspection Covers
- Integration of Gutter Guards With Downspout Placement
- Compliance With Local Building Codes and Regulations
- Prioritizing Foundation Protection Over Cosmetic Choices
- Get a Local Drainage Check From Roofing & Exterior PROS
- FAQ
- Sources
Where on the House to Place Downspouts
Corners do most of the work because they collect runoff from two roof planes at once, which concentrates volume right where you want a clean exit point. Valley ends and low eave points are the next priority: any spot where water naturally pools in the gutter needs its own outlet rather than relying on a long horizontal run to carry it somewhere else.
Placement mistakes show up fast on multi-story homes. Water dumped from an upper roof onto a lower roof section accelerates wear on that lower surface and can force moisture under shingles it was never meant to touch. The same problem happens when a downspout discharges directly over a window, door, or walkway below. A diverter or a wear pad solves this when rerouting isn’t practical, but the better fix is usually running a dedicated line straight to the ground or an underground pipe instead of letting gravity choose the path.
When you’re walking the roofline to plan locations, keep these in mind:
- Put an outlet at every roof valley and every corner where two gutter runs meet.
- Skip spots directly above entryways, patios, or ground-floor windows.
- Route second-story discharge to the ground or a buried line rather than onto a lower roof.
- Add a diverter or splash guard wherever rerouting a downspout isn’t realistic.
Getting this step right before you worry about spacing or pipe size saves a lot of rework later, since moving a downspout after the gutters are hung means new holes, new brackets, and new paint to match.
How Many Downspouts You Need and How to Size Them
Most homes do fine with one downspout every 20 to 50 ft of gutter, and 30 to 40 ft is a common sweet spot for typical ranch and two-story layouts. Roofs with long, uninterrupted runs or heavy valley concentration need outlets on the tighter end of that range.
Pro Tip: Walk your gutter line and mark every spot where two roof planes meet. Those junctions almost always need their own downspout, no matter what the overall spacing formula suggests.
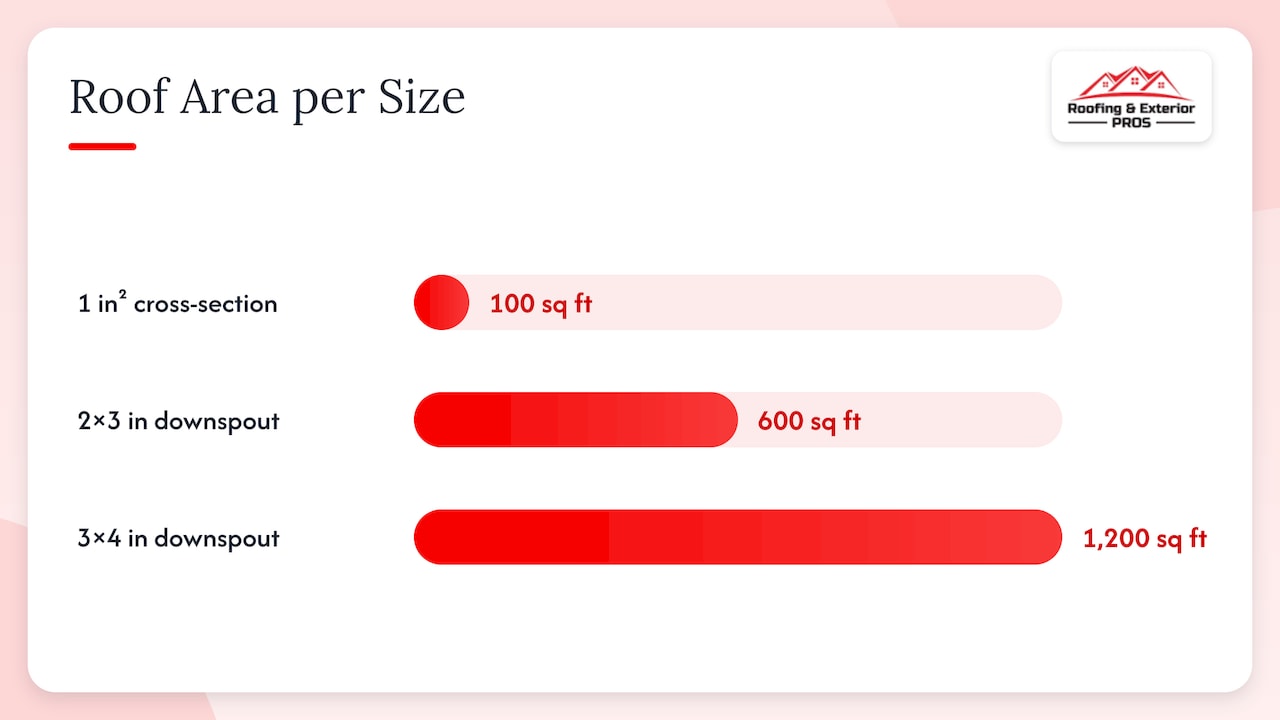
Sizing follows its own rule. The Building America Solution Center recommends about 1 square inch of downspout cross-section for every 100 square feet of roof area being drained. A standard 2×3 inch downspout has roughly 6 square inches of cross-section, which comfortably handles around 600 square feet of roof. A 3×4 inch downspout, closer to 12 square inches, can take on close to 1,200 square feet. Our downspout spacing guide walks through the roof-area math step by step if you want to check your own numbers.
To put the planning steps together:
- Measure the total roof area draining into each gutter section.
- Divide that area by 100 to estimate the downspout cross-section you need in square inches.
- Match that figure to a standard downspout size, rounding up when you’re between sizes.
- Add outlets at corners and valleys before worrying about even spacing along straight runs.
- Increase the downspout count in areas with heavy rainfall or steep, fast-shedding roof pitches.
Directing Water Away: Extensions, Buried Pipes, and Daylighting
A splash block or a rigid extension handles plenty of situations, especially on sandy or well-draining soil where water that reaches 5 or 6 ft from the foundation won’t creep back. Splash blocks typically run 24 to 36 inches, though on clay or slow-draining ground that length is often not enough, and a longer extension or a buried line does a better job of keeping water away from the footing.
Buried laterals solve the problem permanently for homes with tight side yards, finished landscaping, or basements that need extra protection. These lines run underground to daylight at a safe distance or connect to a drywell, and Building Science Education guidance cautions against tying them into a separate foundation drain system, since that can overload it during heavy storms. Use non-perforated PVC or ABS pipe rated Schedule 40 for these runs, pitched at a consistent slope toward the outlet.
Rain barrels and harvesting systems add another layer of planning. An overflow port still needs to send excess water somewhere safe, so a barrel doesn’t replace the need for proper discharge distance, it just adds a step before the water reaches the same extension or buried line.
A few practical notes for choosing between these options:
- Splash blocks work well on well-draining soil and short discharge distances.
- Rigid extensions give more control than splash blocks and resist wind movement better.
- Buried PVC or ABS laterals suit basements, tight yards, and clay soils that hold water near the surface.
- Rain barrel overflow ports still need a clear path to a safe discharge point.
Pro Tip: Never rely on a flexible, accordion-style hose extension as a permanent fix. They sag, collect debris, and tend to redirect water right back toward the foundation within a season or two.
Site Grading: Why Slope and Soil Decide Safe Discharge Distance
Even a well-placed downspout fails if the ground around it slopes the wrong way. Building codes call for a minimum final grade of 5%, meaning about a 6-inch drop over the first 10 ft away from the foundation. Hardscape like patios or driveways within that same 10 ft zone should carry at least a 2% slope.
- Check the first 10 ft of ground around the foundation for a visible downward slope.
- Look for standing water or soggy spots after rain, both signs the grade isn’t doing its job.
- On clay or other slow-draining soils, plan for discharge distances beyond the code minimums.
- Consider a swale or a dry well where regrading alone won’t solve a persistent wet spot.
Clay soils hold water near the surface far longer than sandy soils do, so a downspout that discharges exactly 5 ft from the foundation on clay may still saturate the soil against the footing. Our guide on how gutters can damage foundations covers what that saturation looks like over time and why it’s worth catching early. In genuinely difficult soil conditions, a grading engineer or a perimeter drain is the more reliable answer than extending a downspout a few more feet and hoping.
Materials and Installation Details That Affect Performance
Standard downspout materials include aluminum, galvanized steel, and copper, sized to match the roof area they’re draining rather than chosen purely for looks. A downspout that’s undersized for its roof area backs up during heavy rain no matter how well it’s placed.
Installation technique matters as much as the size. Elbows should fit over the cut end of the downspout, not inside it, since inserting an elbow narrows the flow path and creates a lip where debris and ice catch. Pre-drilling pilot holes before setting sheet-metal screws keeps the metal from deforming and keeps joints tight enough to resist leaks.
For buried laterals, stick with non-perforated ABS or Schedule 40 PVC rather than flexible corrugated hose. Flexible hose sags over time, creates low spots where sediment settles, and rarely holds a consistent slope the way rigid pipe does.
- Match downspout cross-section to the roof area it drains, not just to what matches the gutter style.
- Fit elbows over the cut end of the downspout rather than inserting them.
- Pre-drill screw holes to avoid warping thin metal and loosening joints.
- Use rigid, non-perforated pipe for any buried run meant to last.
Pro Tip: If a downspout elbow already looks crimped or dented at the joint, that’s usually a sign it was installed inserted rather than over the cut end. It’s worth replacing before it starts leaking at the seam.
Maintenance Checklist and Common Placement Mistakes
Gutters and downspouts need a look at least twice a year, typically spring and fall, with an extra check after any major storm.
- Clear debris from gutters and downspout openings before checking for proper flow.
- Inspect joints and elbows for separation, rust, or signs of leaking at the seams.
- Confirm splash blocks and extensions are still angled away from the foundation, not kicked out of place by mowing or foot traffic.
- Watch for soggy soil, algae growth, or settling near the foundation, all signs water isn’t traveling far enough.
- Replace any flexible hose extension showing sag or cracking rather than patching it.
Short extensions and worn flexible hoses are the most common culprits behind water pooling where it shouldn’t. If you notice persistent dampness near the foundation after rain, that’s the moment to recheck placement rather than waiting for a bigger problem. Our page on stopping overflowing gutters fast covers quick fixes for the related issue of water topping the gutter itself.
Roofing & Exterior PROS: What a Professional Inspection Covers
When we inspect a home’s drainage setup, we calculate roof area per gutter section, check every corner and valley outlet, measure the grade within the first 10 ft of the foundation, and flag any soil or drainage concerns before recommending a discharge solution. A quote typically includes a clear, specific plan rather than a generic estimate, so you know exactly what’s being addressed and why.
Integration of Gutter Guards With Downspout Placement
Gutter guards reduce the debris reaching your downspouts, but they don’t change where those downspouts need to go. Corners, valleys, and low points still need dedicated outlets whether or not guards are installed above them.
What guards do affect is maintenance frequency and outlet sizing. A home with heavy tree coverage and no guards often needs more frequent downspout clearing, since needles and leaves that make it past the gutter tend to lodge right at the outlet or in the first elbow. Guards cut down on that buildup significantly, which means fewer surprise clogs at exactly the spots where water volume is already highest.
One detail worth checking during installation: some gutter guard systems narrow the effective opening into the downspout slightly. On a home that’s already sized close to the minimum cross-section for its roof area, that narrowing can matter during heavy rain. It’s a good reason to confirm downspout sizing before adding guards, rather than after.
We install gutter guards as part of our broader gutter repair and installation services, and we size and place downspouts with guard compatibility in mind from the start rather than retrofitting around a mismatch later.
Compliance With Local Building Codes and Regulations
The International Residential Code sets the baseline most jurisdictions build from: roof drainage has to reach an approved location, and grading around the foundation has to meet that 5% minimum slope over the first 10 ft. The code focuses on the outcome, keeping water away from the foundation and avoiding ponding, rather than dictating one universal downspout distance for every property.
That gives local building departments room to set stricter rules. Some municipalities require specific setbacks for downspout discharge points, and the City of Portland’s drainage guidance is a useful example: it recommends at least 6 ft from basements and 2 ft from crawl spaces, and it requires that discharge not create problems for neighboring properties. Other jurisdictions have their own permit requirements for connecting to storm sewers or installing underground laterals.
Before digging a buried line or significantly rerouting discharge, it’s worth a quick call to the local building department to confirm permit requirements and any setback rules specific to your area. Code minimums are a floor, not a guarantee that a particular distance will work for your soil and grading, so treating them as the starting point rather than the finish line keeps you out of trouble twice: once with the inspector, and once with the foundation.
Prioritizing Foundation Protection Over Cosmetic Choices
The cheapest downspout setup is rarely the one closest to the house. An extra 5 ft of lateral pipe costs far less than repairing a saturated foundation, and that math should drive every placement decision, not how the extension looks from the driveway; understanding the types of foundation problems in Detroit homes highlights why proper water management is so critical.
— Jake Ehlinger
Get a Local Drainage Check From Roofing & Exterior PROS
Gutter installation, downspout repositioning, and buried lateral piping to daylight are common parts of professional exterior drainage work, with proper placement making a significant difference for foundation protection over time.

If your current setup leaves water pooling near the house or you’re planning a gutter replacement, our gutter repair services, cleanings, and guard installation page covers what we offer, and our gutter drainage planning guide walks through the bigger picture if you want to plan ahead. Request a free inspection and we’ll walk the roofline with you, check your grading, and recommend a discharge plan suited to your soil and layout.
FAQ
How far should a downspout be from the foundation?
Most guidance recommends at least 5 ft on open grade, extending to 6 ft or more near basements, or routing to an underground catchment at least 10 ft away. Clay or slow-draining soils often call for distances beyond those minimums.
How many downspouts does a house need?
Plan on one downspout roughly every 20 to 50 ft of gutter, with 30 to 40 ft typical for many homes, plus a dedicated outlet at every corner and valley low point. Heavy rainfall or long roof runs push the count toward the tighter end of that range.
Can a downspout drain into the foundation drain system?
No. Building Science Education guidance specifically warns against connecting downspout laterals to a separate foundation drain, since the added volume can overload it during heavy storms. A dedicated lateral to daylight or a drywell is the safer route.
What pipe should I use for a buried downspout extension?
Non-perforated ABS or Schedule 40 PVC pipe holds a consistent slope and resists the sagging that flexible corrugated hose develops over time. Building America Solution Center guidance recommends pitching buried laterals at least 5/8 inch per foot for the first 10 ft away from the house.
Does grading really matter if my downspouts are placed correctly?
Yes. Even a well-placed downspout fails if the surrounding grade doesn’t carry water away, since the International Residential Code calls for a minimum 5% slope, about a 6-inch drop, over the first 10 ft from the foundation. Placement and grading work together, not separately.
Sources
- Gutters and Downspouts | Building America Solution Center
- International Residential Code (IRC) — site drainage / foundations
- Foundation drain, Gutters, Downspouts | Building Science Education
- Managing rain on your property – Downspout disconnect | City of Portland